


Stella Development - Mesh Creation
- ChristheLancer1997
- Nov 12, 2018
- 7 min read
Updated: Jan 16, 2019
Following on from the previous blog post, I will now go through the process of how I created the mesh, in a condensed, readable format. A timelapse will be available aswell soon as a link to YouTube which will be posted on the blog, but with less descriptive narration. Enjoy!

Starting the Project off, I made sure to compile some 3D Facial Anatomy reference from both Google and Youtube, to see how I would form the head and body. Aneta V's, a Youtuber who posts Character Modelling tutorials, helped me get started and a couple of other Google Images.

Blocked out 3D Head references are very useful in any process, as it's helpful in getting the basic shape right. One thing I had to be vary of though, is making sure that I look at my Character sketch out reference aswell, so I want the outcome to result in it looking like Stella.

From the 4th Head mesh onwards, I was trying to get the facial features out more, as evidenced below.

Here you can see the upper body and also different meshes coming into the equation. I added an additional mesh for the eyebrows as they are quite thick in the concept. I also added earring accessories on both sides of her ears.
Initially I was quite uncomfortable in making the arms, as I couldn't get the shape correct. So I created a separate Cylinder for the arm, and also practised to get the form right. This was also going to be the case with the thighs and legs, as you can tell from the gaps.


The body curvature was defined by dragging the side vertices of her back and pushing them inwards for each vertices as I was going along downwards. They then go back outwards slowly, as you can see from the left image below. The side orientation helps a lot when trying to accomplish form like this.


The ears at the start had a slight problem because the surrounding topology all followed on into the ear, so the edges were quite visible as you can tell from the right image.

Following on from the armature, I decided to completely delete the cylinders and stretch out the arms from the body. The same technique was applied to the legs.
I started on the hair here aswell, which was modelled from a Box. The way I created it from a Box was by extruding the faces further back until it reached the end of her head.
There was quite a bit of form already applied to the early part of the legs, especially the kneecaps which I was proud of.

The face started getting pieced together, as I added smoothing groups to define different areas of the face such as the Nose and the Lips. The eyelashes were also made by simply extruding the edges of her eye outline. I also went ahead and scaled the ears as they were far too small before.

Finally, the block-out phase was mostly over and I almost had a full body mesh (expect for the fingers). The smoothed out body also really fleshed out the character. As you can also see, the hair was brought downwards, with rather spiky strands. The crystal necklace accessory she wears was also added here. The necklace was made by a cylinder and was extruded around the character's neck carefully. This was relatively high-poly as seen from the image below, but I would consider to reduce the poly count of the necklace later on.


This is a closer look at what the face's topology looked like at that state. There was quite a couple of disjointed edges, but that would be remedied later on.

I added more definition to the hands on this stage of development, by giving slightly more shape to it and also adding fingers. The breasts were also done, but the overall chest area needed tweaking to make it look more like she was wearing a shirt.

As for the creation of the shirt itself, it was incorporated simply by selecting faces and scaling a set of body parts (chest, lower neck, stomach and her shoulder) from all axis' very slightly. The armband accessory on her right arm is visible here too, which was done through the exact same method as the shirt.

The eyelashes below were made by small cylinders, carefully placed on the eyeline so that the deleted face on the front-end of the cylinders wouldn't be exposed. The curvature here was quite important, as Stella has rather robust eyelashes that are quite long. It took several tries to create the perfect curvature, but looking back at it I could've most definitely used less poly's then I ended up with.


The above images showcase an update to the topology and overall mesh, where I've incorporated a refine to the chest area, added a faint stomach line and belly button, added the toes to her feet, refined the overall back area and shoulder blades and also the bottom.

I decided on another strategy to implement the clothes, which was rather simpler than the method I used earlier; I would select the corresponding faces on the body mesh making up the clothes, assign a material to them (white material for shirt, blue for pants) and start adding in a couple of more edge loops to create a ripple effect on the shirt and pants.


I decided to export the mesh to see what it would look like animated. While the mesh would move perfectly, I saw a lot of proportion errors which I hadn't realised earlier. Which is why I can't stress enough to ALWAYS bring any state of your mesh throughout the development onto an automatic animator website such as Mixamo.
This way you get to see all the mismatched body proportions that you may have made. In this case, the top part of Stella's front neck had too much curvature and should've become more straight, as you can see from the second image above. The armature itself was also not looking too good when it became was being bent. This was all fixed in 3DS Max afterwards.
I animated it once more to see the results, and it looked much better than before.


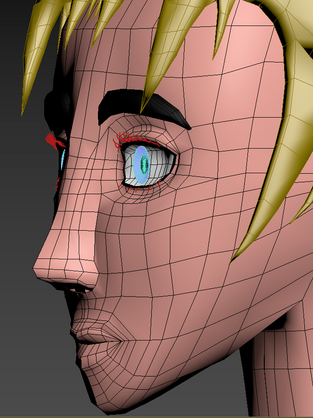
I also assigned a skin material to the body, which made the character really look fleshed out. I followed a tutorial for the eyes which was done on Blender, to have it stylized and look manga. The sclera edges would be pushed in slightly, and the iris would have its own dedicated mesh (based on the bottom face of a Cylinder) that would move around to create movement on the eyes (as demonstrated on the second image below). At this stage, it did need more development and tweaking though.


I also animated the mouth to try out some static facial animations, for morphing later on in development. These are done quite simply by cutting inbetween the upper and lower lip of the character, and manipulating vertices until you get the desired expression.


Following on from the previous picture, I added a Belt and also added better Shirt folds, which I tried to emphasise around the belt area to create a tucked-in shirt look. The hair has also been improved here, as I added more strands to the side of the hair and the back.

A set of teeth were also made, that derived from a box mesh. Getting the shape of the teeth right was quite important, as it could essentially make or break the looks of the character if it looked too peculiar, as I was striving for normal human teeth.
Shoes were also produced, that came with an LED light emission from the bottom of the shoes to fit with the setting of the futuristic story, However, later on in development I realised it would have Stella stand out too much, so I decided to remove it.


A major alteration that I made was to the eyes, in which I replaced them with spheres. This would make them look more realistic and easier to animate aswell by simply grabbing both eyes and rotating them from the local reference coordinate system.


While the latest mesh was becoming increasingly more efficient and better looking, I wasn't too happy about the eyes, as they looked like they were out a bit too much, appeared too googly and the femininity wasn't there at the moment. So with those issues at hand, I once again tweaked the face, focusing specifically on the eye area and tried my hardest to look at the reference images that I created for Stella initially.

The image above captures the results of the improvements. What I had done to add in more femininity to the face was by simply increasing the lengths of the eyelash ends, increasing the iris size, lengthening down the bottom lip and also adding more depth to the eyeliner. The hair was also altered from one side, by removing the Instance and giving the right side a slight flick. I was very pleased with the results, as opposed to the previous version.


To check on the rendering of the mesh within a Game Engine, I exported the current Stella mesh into Unity and proceeded to view how it looks like.

From what you can see here in the image, the mesh looked good in Unity, however there were slight mesh rendering problems with the upper nose bridge section and above the lips. This was either caused by inconsistency in the topology or by an N-Gon or Triangle polygon. I would then go in 3DS Max and fix these issues.


I tested out the final mesh version on Mixamo and everything was on track. I had to Unwrap UV every part of the mesh before it was time to use Substance Painter and texture everything.


My main goal on Substance Painter was to achieve painting in the basic colours for the textures and then adding in small details. I experienced an issue where the texture resolution wasn't as refined as I thought it would be, as I was going to draw in the shirt/jeans wrinkles. This was because the UV Islands were smaller and I needed larger islands for the quality to spike up. Regardless I couldn't find a sharper brush for me to use, but I went along and finished it up.


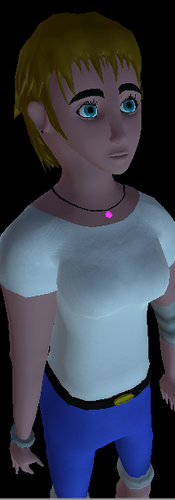
To finish everything up, I brought the textured version of Stella into Unity. I was very proud of the outcome.


Things that I've learnt through the process of creating Stella:
- Body Proportions should be looked at through Animations
- Female Body Anatomy
- Complex Hair Mesh Arrangement
Things that I would improve from the process of creating Stella:
- Decisive planning on how I will create the mesh
- Using Reference Image Planes more often in 3D package
- Texturing Phase (Learning to make more complex Alphas, sharper brushes etc.)
I hope you have enjoyed your read, stay tuned as there will be a Timelapse video available on another Blog post very soon!


Comments